2020-08-05 5 分钟 0.7 k 0次访问
简单搭建go-fastdfs
简单搭建go-fastdfs
1
2
3
4
5
| #如何安装(how to install ?) wget https://github.com/sjqzhang/go-fastdfs/releases/download/v1.3.1/fileserver
chmod +x fileserver
./fileserver & #如何上传(how to upload? ) curl -F file=@readme.md -F path=test http://127.0.0.1:8080/upload
#如何下载(how to download? ) wget http://127.0.0.1:8080/group1/test/readme.md #如何配置(how to config?) vim conf/cfg.json #如何查看日志(how to view log?)
tail -f log/fileserver.log
|
linux一键安装
1
| wget --no-check-certificate https://github.com/sjqzhang/go-fastdfs/releases/download/v1.3.1/fileserver -O fileserver && chmod +x fileserver && ./fileserver
|
Docker体验
1
| docker run --name fastdfs -v /data/fastdfs_data:/data -p 8080:8080 -e GO_FASTDFS_DIR=/data sjqzhang/go-fastdfs
|
编译安装
1
2
3
4
5
| git clone https://github.com/sjqzhang/go-fastdfs.git
cd go-fastdfs
mv vendor src
pwd=`pwd`
GOPATH=$pwd go build -o fileserver fileserver.go
|
小集群安装
适用于单一的集群,扩展性相对差一点。
1
2
3
4
5
6
7
8
9
10
11
12
13
14
15
16
17
18
19
20
21
22
23
24
25
26
27
28
29
30
31
32
33
| worker_processes 1;
events {
worker_connections 1024;
}
http {
include mime.types;
default_type application/html;
log_format main '$remote_addr - $remote_user [$time_local] "$request" '
'$status $body_bytes_sent "$http_referer" '
'"$http_user_agent" "$http_x_forwarded_for"';
access_log /var/log/nginx/access.log main;
error_log /var/log/nginx/error.log error;
sendfile on;
keepalive_timeout 65;
client_max_body_size 0;
proxy_redirect ~/big/upload/(.*) /big/upload/$1; #继点续传一定要设置(注意)
upstream go-fastdfs {
server 10.1.14.36:8080;
server 10.1.14.37:8080;
ip_hash; #notice:very important(注意)
}
server {
listen 80;
server_name localhost;
location / {
proxy_set_header Host $host; #notice:very important(注意)
proxy_set_header X-Real-IP $remote_addr; #notice:very important(注意)
proxy_set_header X-Forwarded-For $proxy_add_x_forwarded_for; #notice:very important(注意)
proxy_pass http://go-fastdfs;
}
}
}
|
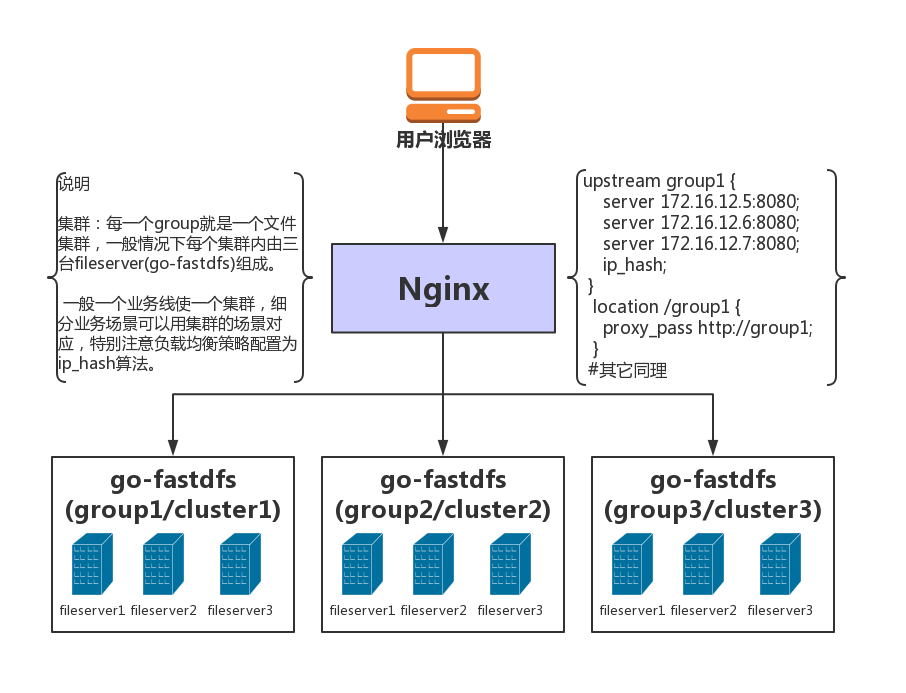
海量集群安装(推荐)
适用于海量集群,扩展性较好。
1
2
3
4
5
6
7
8
9
10
11
12
13
14
15
16
17
18
19
20
21
22
23
24
25
26
27
28
29
30
31
32
33
34
35
36
37
38
39
40
41
42
43
44
45
46
47
48
49
50
51
52
53
54
55
56
57
58
59
60
61
62
63
64
65
66
| worker_processes auto;
events {
worker_connections 1024;
}
http {
include mime.types;
default_type application/html;
log_format main '$remote_addr - $remote_user [$time_local] "$request" '
'$status $body_bytes_sent "$http_referer" '
'"$http_user_agent" "$http_x_forwarded_for"';
access_log /var/log/nginx/access.log main;
error_log /var/log/nginx/error.log error;
sendfile on;
keepalive_timeout 65;
rewrite_log on;
client_max_body_size 0;
proxy_redirect ~/(\w+)/big/upload/(.*) /$1/big/upload/$2; #继点续传一定要设置(注意)
#以下是一下横向扩展的配置,当前统一大集群容量不够时,只要增加一个小集群,也就是增加一个
#upstream ,一个小群集内按业务需求设定副本数,也就是机器数。
upstream gofastdfs-group1 {
server 10.1.51.70:8082;
#server 10.1.14.37:8082;
ip_hash; #notice:very important(注意)
}
upstream gofastdfs-group2 {
server 10.1.51.70:8083;
#server 10.1.14.36:8083;
ip_hash; #notice:very important(注意)
}
server {
listen 8001;
server_name localhost;
if ( $request_uri ~ /godfs/group ) {
# 注意group会随组的前缀改变而改变
rewrite ^/godfs/(.*)$ /$1 last;
}
location ~ /group(\d) {
#统一在url前增加godfs,以便统一出入口。
proxy_set_header Host $host;
proxy_set_header X-Real-IP $remote_addr;
proxy_set_header X-Forwarded-For $proxy_add_x_forwarded_for;
proxy_pass http://gofastdfs-group$1;
}
location ~ /godfs/upload {
#这是一个横向扩展配置,前期可能只有一个集群group1,当group1满后,只需将上传指向group2,
#也就是将rewrite , proxy_pass 中的group1改为group2即可。
proxy_set_header Host $host;
proxy_set_header X-Real-IP $remote_addr;
proxy_set_header X-Forwarded-For $proxy_add_x_forwarded_for;
rewrite ^/godfs/upload /group1/upload break;
proxy_pass http://gofastdfs-group1;
}
location ~ /godfs/big/upload {
#以上上类似。
proxy_set_header Host $host;
proxy_set_header X-Real-IP $remote_addr;
proxy_set_header X-Forwarded-For $proxy_add_x_forwarded_for;
rewrite ^/godfs/upload /group1/big/upload break;
proxy_pass http://gofastdfs-group1;
}
}
}
|

